
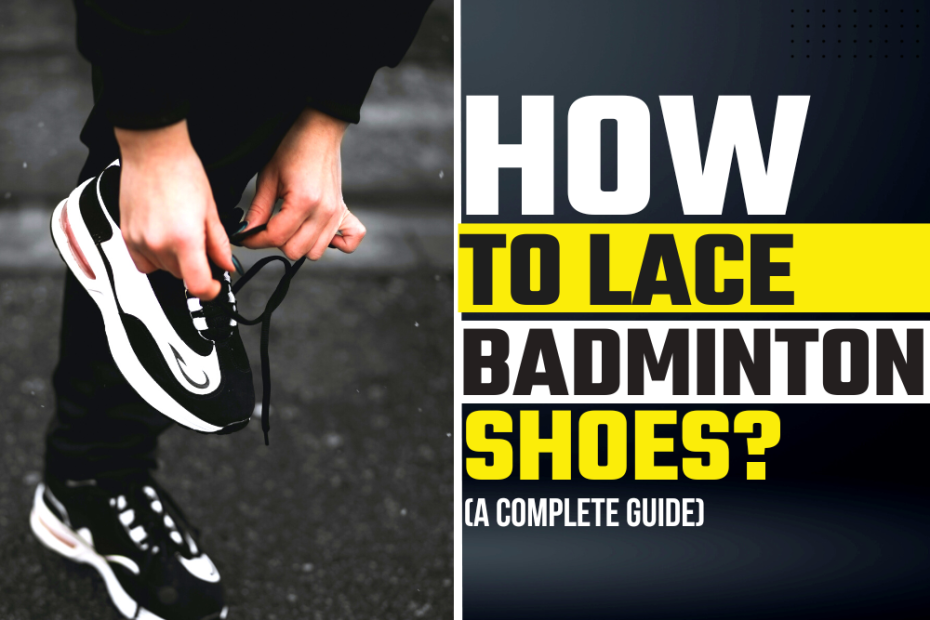
Did you know that there are over 2 trillion possible ways to thread your laces through six pairs of eyelets on your badminton shoes? While discussing all of these techniques isn’t feasible, I’ll walk you through at least five of the quickest and most effective methods for lacing or tying your shoes.
In this guide, our focus will be on lacing techniques that provide a secure fit, ensuring your feet are comfortably supported and preventing slipping or discomfort during activities like jogging, running, or playing.
Let’s explore these five lacing techniques, each designed to enhance comfort and securely enclose your feet.
Also check: Best Badminton Shoes in India.
Different Lacing Techniques for Badminton Shoes
Let’s begin with:
1. Heel Slipping Lacing Technique
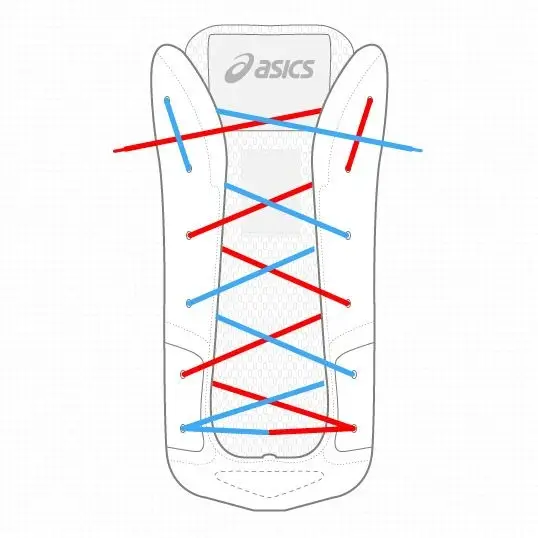
Slipping of the heel or the entire foot inside the shoe is a common issue many people encounter, especially during physical activities like badminton. This discomfort can be distracting and affect your performance on the court. Fortunately, there’s a lacing method that not only addresses this problem but also aids in treating blisters as they develop.
This lacing technique effectively tightens the area around the top of the laces, providing additional stability to the ankle and heel. By securing the foot firmly in place, it minimizes slippage and enhances overall comfort during gameplay.
How to Lace Badminton Shoes:
Begin by lacing the shoe from the bottom, using a standard diagonal crossing technique. As you approach the next-to-last eyelet, transition to a vertical ascent. Thread the laces underneath the vertical lace after crossing them over. Finally, bring the laces back up to the top and secure them with a knot. This lacing method provides additional support and stability, reducing the likelihood of slippage and discomfort during physical activity.
2. Toe Pains Lacing Technique
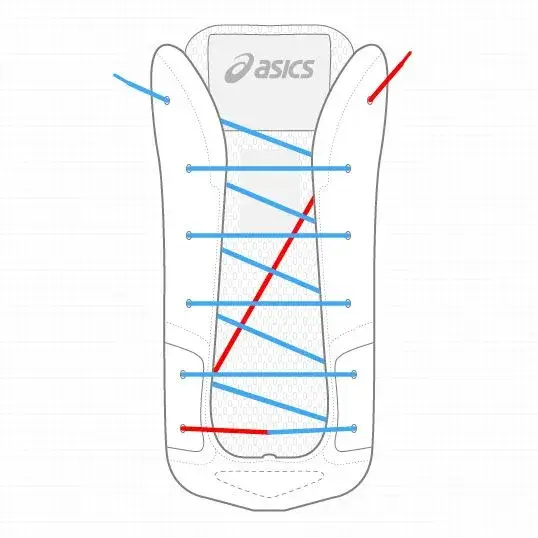
If you’re experiencing aching toes due to compression or discomfort from them pressing against each other, this lacing technique is for you. Whether it’s because of tight shoes or toenails pressing into adjacent toes, compressed toes can be quite unpleasant. By implementing this lacing method, you can provide your toes with the space they need to spread out naturally, alleviating discomfort and promoting better foot health.
How to Lace Badminton Shoes for Toe Relief:
- Begin by lacing the bottom two eyelets evenly with equal-length laces.
- Take one end of the lace and thread it all the way to the top eyelet of the opposite shoe.
- On the other side, thread the lace diagonally to the next eyelet.
- Cross back over to the original side in a horizontal motion.
- Repeat this diagonal and horizontal lacing pattern until you reach the top of the shoe.
- Finally, secure the laces with a knot.
By following this lacing method, you can provide your toes with more space and alleviate discomfort caused by compression or tight-fitting shoes.
3. Lacing Technique for Wide Feet
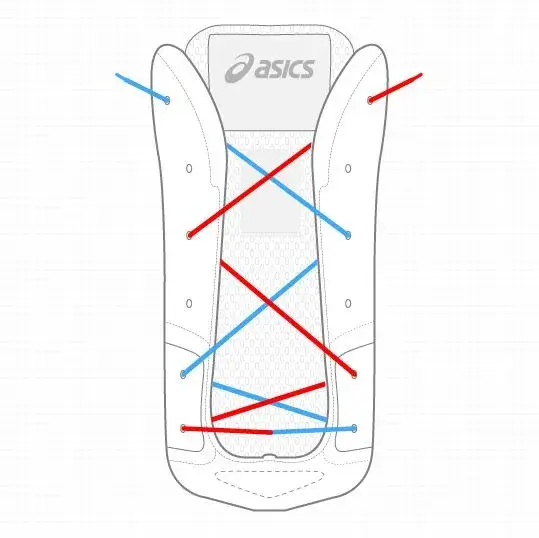
Many individuals struggle with the narrow fit of badminton shoes, leading to discomfort during play. However, even if you don’t have wide feet, you can still benefit from this lacing technique to enhance the comfort of your shoes.
This method involves skipping the shoe’s eyelets, allowing for more room and reducing pressure around the lacing area. It’s essential to note that skipping more than one eyelet in a row may not be advisable. If your shoes consistently require loosening, it might indicate the need for a larger shoe size.
By implementing this lacing technique, you can optimize the fit of your badminton shoes for a more enjoyable playing experience.
Step-by-Step Guide to Lacing Your Badminton Shoes:
- Begin by lacing your shoe straight through the first eyelet, starting from the bottom.
- Cross the laces over and fasten them down using the second eyelets.
- Continue lacing up on the same side, progressing through the third set of eyelets.
- Cross over again and lace up through the fourth set of eyelets. Then, skip through the fifth set of eyelets.
- Repeat this pattern until you’ve used all the eyelets on both sides of the shoe.
By following this lacing method, you can achieve a secure fit while optimizing comfort during your badminton sessions.
4. Lacing Technique for Narrow Feet

This lacing method is particularly beneficial if you find your badminton shoes aren’t snug enough, or if you have smaller feet.
Wearing excessively loose badminton shoes can lead to problems like heel slippage and increased risk of blisters or accidents, especially during lateral movements.
By utilizing this lacing technique, you can achieve a tighter and more concentrated fit around the middle of your foot, ensuring better overall shoe fit and reducing the likelihood of discomfort or injury during play.
Guide to Lacing Badminton Shoes:
- Begin lacing your shoes from the bottom using a standard diagonal crossing pattern.
- Continue crisscrossing the laces all the way up, maintaining a regular pattern. However, omit the fourth eyelet.
- Proceed with lacing the remaining eyelets as usual.
- Tie the laces securely at the top to ensure a snug fit.
By following this lacing technique, you can achieve a comfortable and secure fit for your badminton shoes.
5. Too High on Top Lacing Technique

This lacing technique offers relief from foot pain, whether you have high arches or a high midfoot. Many individuals experience discomfort or soreness on the tops of their feet due to the tight fit of badminton shoes.
By lacing shoes horizontally rather than diagonally, this method aims to distribute pressure from the shoelaces across the feet more evenly. This results in reduced friction, providing a more stable and comfortable fit.
How to Lace Badminton Shoes:
- Begin by lacing both laces equally through the first two eyelets.
- Thread both laces evenly through the next two eyelets.
- Take one side and vertically thread it up to the following eyelet.
- Skip one eyelet on the opposite side while threading up.
- Thread each side horizontally across to the next eyelet.
- Vertically thread the first side, skipping one eyelet, and then horizontally thread it to the opposite eyelet.
- Take the second side and thread it up to the eyelet previously used by the first side.
- Both laces will now pass through the same two eyelets when threaded horizontally.
- Continue threading this side until reaching the top eyelet, then thread it out.
- Finally, thread the remaining lace up.
By following these steps, you can effectively lace your badminton shoes to alleviate foot discomfort and ensure a more enjoyable playing experience.
6. Criss-Cross Lacing Technique
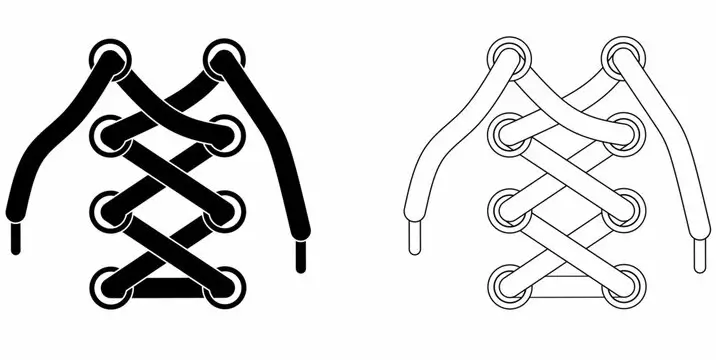
For individuals with normal feet, the conventional criss-cross lacing method is suitable for Yonex badminton shoes.
Simply threading the laces through all eyelets in a cross-over pattern prepares you for games and activities, providing a secure fit for optimal performance.
How to Lace Yonex Badminton Shoes:
- Start by inserting each end of the shoelace from the inside, beginning with the two frontmost opposite-facing holes of the shoe, with the toe pointed away. Ensure the lace ends are balanced on both sides.
- Insert the right end of the shoelace into the subsequent left hole while moving diagonally from the top. Alternatively, for a tidier appearance, you can insert the lace so that it points from the front of the shoe inward, rather than from the inside pointing outward.
- Insert the left end of the shoelace into the next right hole.
- Continue this criss-cross pattern until you reach the end of the shoe.
- Once you reach the end, tie up the laces securely.
By following these steps, you can effectively lace up your Yonex badminton shoes for a comfortable and secure fit during gameplay.
Final Words
These diverse lacing techniques for badminton shoes offer an excellent grip and ensure a perfect fit for your feet, enhancing your performance on the court.
However, for individuals with normal feet, the traditional criss-cross lacing technique remains a reliable choice. Simply thread the laces in a criss-cross pattern through all the eyelets, lace them up securely, and you’re ready to engage in games and activities.
If you encounter any challenges or have questions regarding the techniques discussed in this post, feel free to reach out to us or leave your inquiries in the comment section below.